
LISTSERV Knowledge Base
Basic
- What is LISTSERV?
- How to request LISTSERV?
- How to use LISTSERV?
- Your Role
- The List Owner
- Get Familiar with LISTSERV web interface
- How to send email to my list as a LISTSERV Owner
- What to receive when get the LISTSERV email from an owner
Advanced
- How to configure an announcement list
- How to import a list of subscribers from Excel (Bulk Operations)
- Deleting All Members Through Bulk Operations
- How to delete messages from the list archive
- How to Check the number of Subscribers on my List
- How to Manage My List
- How to Add Subscribers from My List
- How to Delete Subscribers from My List
- How to Set Up Topics for My List
What is LISTSERV?
LISTSERV is an online email list management program which makes it easy and effective to administer and manage large email lists and communications.
The key features are:
- send messages or announcements
- moderate discussions
- control topics
- manage flows
- prevent spam
- generate archives and reports
- search messages, subscribers, topics, etc.
- do bulk additions and deletions
To prevent spam and server overload on UHCL Outlook, OIT strongly recommends you to use LISTSERV if your distribution list has over 250+ emails.
How to request LISTSERV?
- Fill up the Request Form
- OIT System Administrator will setup for you
How to use LISTSERV?
Login
- Go to: http://lists.uhcl.edu
- Log in with your campus email address and password

Your Role
There are many roles in LISTSERV: List Owners, List Moderators, List Subscribers, and Non-Subscribers. Currently in UHCL setup, once your request is granted, you are the List Owner.
List Owner
List owner is the person formally in charge of the operation of a specific list(s). The list owner is usually knowledgeable in the field covered by the list. There can be more than one list owner for a list. The list owner can do the following:
- Set and change the configuration of the list
- Add, delete, and modify subscriptions to the list
- Assist subscribers and potential subscribers
- Set policies, procedures related to the list, and send administrative messages to the list
- Run reports on list activity
Get Familiar with LISTSERV web interface
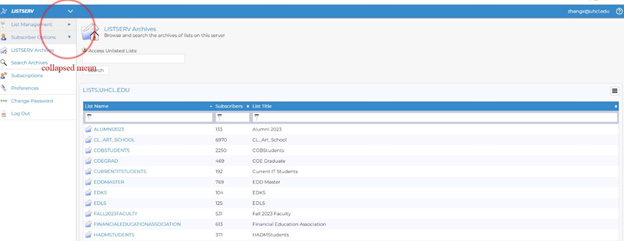
Once you log in as a List Owner, you will see the collapsed menu on your left; List names on the right; you can search the list and list title.
How to send email to my list as a LISTSERV Owner
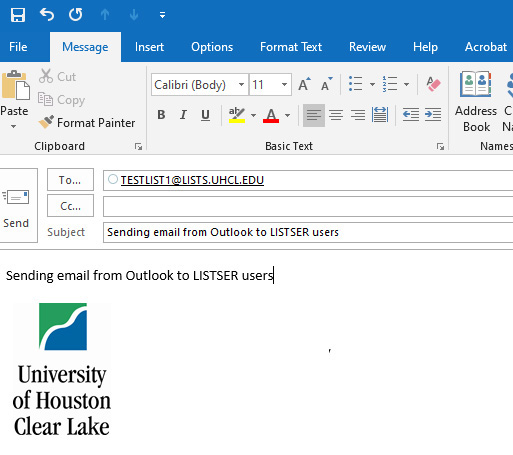
To distribute email to the members of your LISTSERV, use your Outlook client or Webmail. Compose the email to the listserv as you would any email. Email attachments are allowed. Address the email using your listserv’s name and the list server name: ‘lists.uhcl.edu’. As an example, if your listserv name is “TESTLIST1” the email address in the “To” field would be: TESTLIST1@LISTS.UHCL.EDU. NOTE: Only listserv Owners or other authorized senders are permitted to send email to the respective listserv.
Once your email has been received and processed by the listserv you will receive a confirmation email from the listserv with the number of member recipients in the list:

What to receive when get the LISTSERV email from an owner
If the owner add your email address to List, e.g. xxx@uhcl.edu to the List “testlist1”, you as a receiver will receive the email as below. The sender as testlist1@lists.uhcl.edu

How to manage my list
- Once you login
- Click List Management
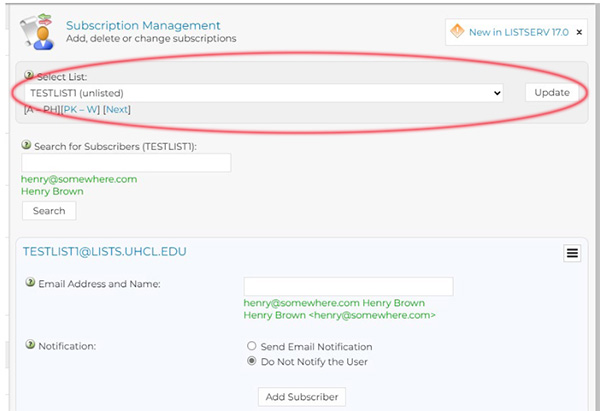
- Select the list you want to manage under Select List:
- Then click "Update"
How to configure an announcement list
- Click List Management
- Click List Configuration
- Click Send, which is a key word to control how your message is sent
- From the dropdown of Send=, Select Owner, which only you as an owner can send messages
- Check the checkbox of Confirm: and Only Non-Members confirm: So, the illegitimate senders can’t send emails to your list
- Click Update

How to import a list of subscribers from Excel
Make sure the Excel is in a correct format to export to a text file:
Let's say that you store your membership information in an Excel workbook. Such a
file might look like this:
The first step is to create a new, blank Excel workbook. Next, in the workbook containing
your subscriber data, select only the columns containing the email address (mandatory)
and names of the subscribers (optional). LISTSERV will not accept any other information
for bulk uploads. Then copy the email addresses (mandatory) into column "A", the first
names (optional) into column "B" and the last names (optional) into column "C". The
data must be in that order. Finally, you should delete any header rows. The resulting
new workbook should look like the following:
Click File > Save As, and type your file name, then select Text (Tab delimited) (*.txt) as your file type and click Save. This will produce a file that LISTSERV's bulk upload
feature can accept.
Uploading the Text File You Created
- Click List Management
- Subscriber Reports
- Bulk Operations
- Import the text file
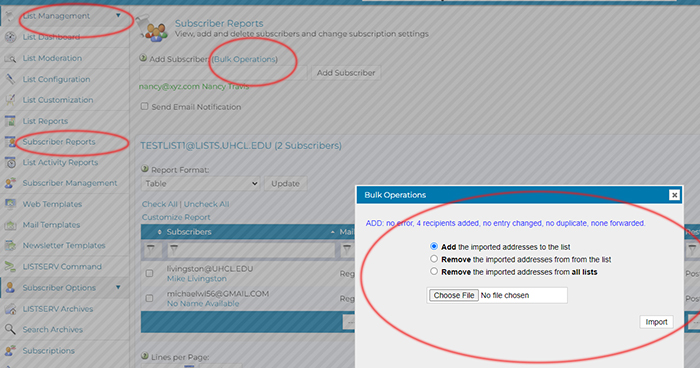
- The newly add subscribers will be listed under Subscribers

NOTE: Large adds may take a long time to finish. Additionally, there is no feedback of the status until the operation completes. Do not click on the “Import” button more than once. Clicking multiple times will cause the selected operation to be executed multiple times.
More information on the Bulk Operations can be found here: LISTSERV Tech Tip: How can I import a list of subscribers from Microsoft Excel into LISTSERV? (lsoft.com)
Deleting All Members Through Bulk Operations
At times there may be a need to completely refresh a list. To do this, all current users need to be removed. This can be accomplished by using the Subscriber Reports screen to delete one screen full of members at a time or by using the Bulk Operations screen to delete all existing users at one time. The latter method is the preferred method for large lists.
To delete all list members, you must first create an Excel CSV file of the existing
members
Use the Subscriber Reports screen to produce the deletion list by changing the “Report
Format” from “CSV format”. Click “Update”. This should produce a CSV file located
in your Downloads area.
Once the file is produced edit the file using excel. Remove all columns except for the column containing the members’ email address. If the resulting column contains any information but the email address use global replace to move the unnecessary information including trailing spaces.
Save the resulting CSV.
Using the Bulk Operations screen choose “Remove the imported addresses from the list”.
Do NOT use the “Remove the imported addresses from all lists”. To get started, click
on “Bulk Operations’.
(See the following screen capture.)
Use “Choose File” to locate the edited CSV file created previously.
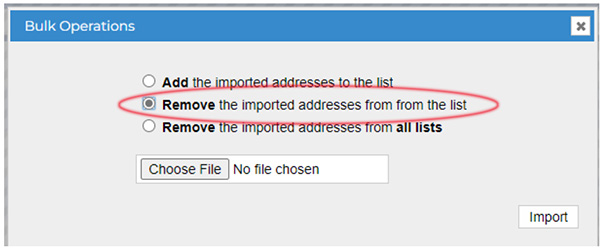
Perform a last-minute check to verify that the correct list is selected and that the correct operation is selected. If everything is correct, click “Import” to perform the bulk operation.
NOTE: Large deletes may take a long time to finish. Additionally, there is no feedback
of the status until the operation completes. Do not click on the “Import” button more
than once. Clicking multiple times will cause the selected operation to be executed
multiple times.
Once the delete operation completes close the Bulk Operations screen and allow the
screen to refresh.
To add the new members previous section, “Adding New Members Through Bulk Operations
How to delete messages from the list archive
- Go to LISTSERV Archives
- Click your list
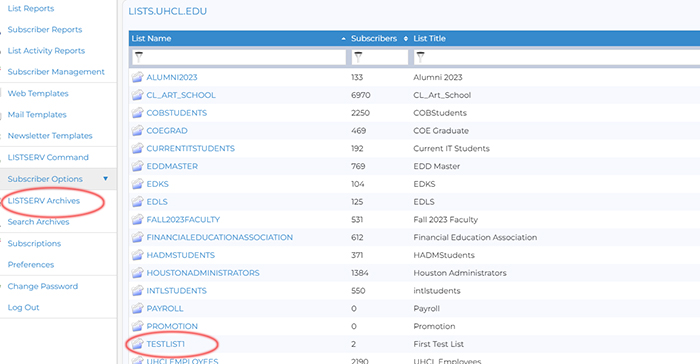
- Click the trash can

How to Check the number of Subscribers on my List
- Click List Reports to see the number of subscribers

-
Click the number to see the subscriber setting

How to Add Subscribers from My List
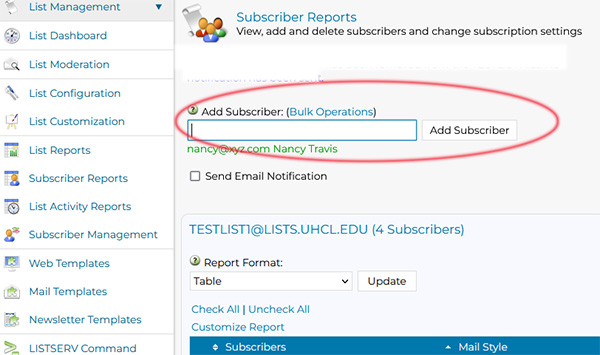
- Go to List Management
- Then Subscriber Reports
- Type the email under Add Subscriber
- Click Add Subscriber
How to Delete Subscribers from My List
- Go to List Management
- Then Subscriber Reports
- Check on the checkbox next to the email you want to delete
- Check Send Email Notification if you plan to notify the to be deleted subscriber
- Click Delete Subscribers

How to Set Up Topics for My List
Topics provide a way to run an email list where topics are being discussed. Subscribers can choose the topics that they are interested in and receive the emails to that topic. You can set up to 23 topics for your list. The topic which you setup, will appear on your email subject:
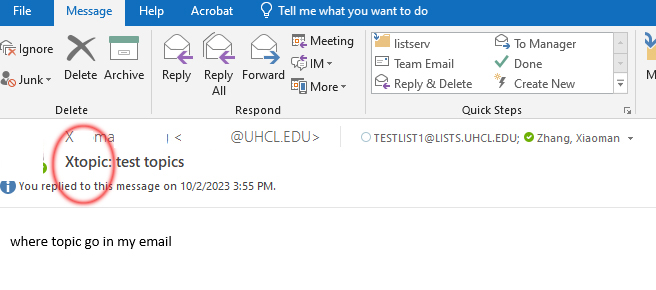
To set up your topic lists:
- Click List Configuration
- Under Keyword, type “Topics”
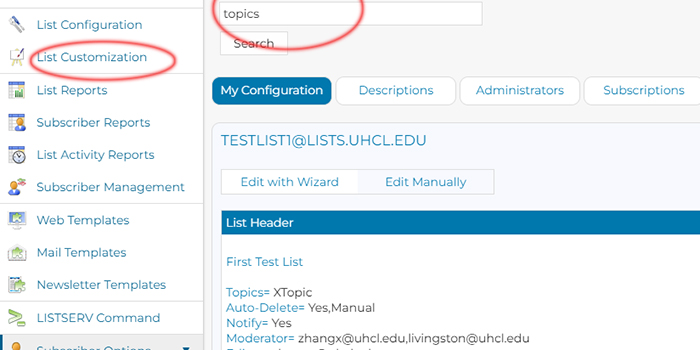
- Enter the topics you desire to add. One topic per line and no space, “:” or other
special characters on your topic:

- When post messages, you can choose the topic you have added:


