


Using CMS Dependency Manager
Why Dependency Manager Is Important
The Dependency Manager helps maintain the integrity of our university website by keeping track of links that point to pages and files within Modern Campus CMS. It ensures that links remain accurate and functional, even when content is updated, by creating a "dependency tag" for each unique page, file, or image.
When a file or page is renamed or moved, the Dependency Manager automatically updates the associated links to prevent them from breaking. It also monitors deleted content, which helps us identify and fix any broken links.
Insert/Edit Link To Page or Document
- While editing an editable region, select the text or image to display as a link.
- Click Insert/Edit Link
 in the What You See Is What You Get (WYSIWYG) toolbar to open the Insert/Edit Link
box.
in the What You See Is What You Get (WYSIWYG) toolbar to open the Insert/Edit Link
box. - In the URL field, paste the external web address (if linking to a file outside of
www.uhcl.edu) or click the file chooser
 and navigate to the file you are linking to. Click the file to link, and then click
Insert. You will see the dependency manager tag is inserted into the URL field for this
link.
and navigate to the file you are linking to. Click the file to link, and then click
Insert. You will see the dependency manager tag is inserted into the URL field for this
link. - Set the Open Link In field to Current Window or New Window (if linking to an external source), using the dropdown.
- Click Save.
Insert/Edit Image
- While editing an editable region, click the Insert/Edit Image icon
 in the toolbar.
 - In the Source field, click the file chooser File Chooser icon
- Navigate through folders in your Modern Campus CMS site using the dropdown.
- Click your image file.
- Click Insert.
- In the Image Description field, enter alternate text to describe the image if the image cannot be displayed. This is important to meet accessibility compliance standards.
- Enter new values in the Width and Height fields to modify the dimensions of the image. Click the lock icon to constrain proportions.
- Set the styling for your image, using the Class dropdown.
- Click Save.
How To Determine Which Pages Link to a File Using the Gadgets Tool
Step 1: Open Your File In Staging
Navigate to the web page, file, or image within CMS and click the filename to open it in staging.
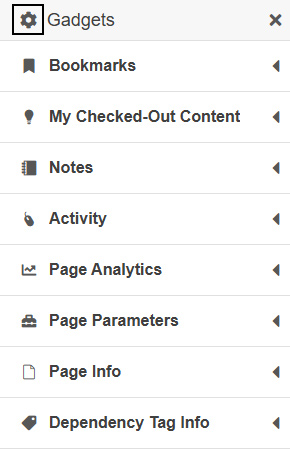
Step 2: Open "Show Gadgets"
Click the small plug icon ![]() in the upper right corner of the screen to reveal the "Show Gadgets" menu.
in the upper right corner of the screen to reveal the "Show Gadgets" menu.
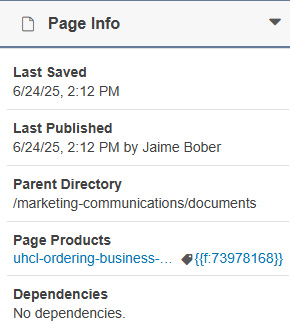
Step 3: Expand "Page Info"
Click on "Page Info" and then under "Page Products" click the link surrounded by curly brackets - example: {{f:...}} - this is the "dependency tag" of the page/file you are viewing in staging.
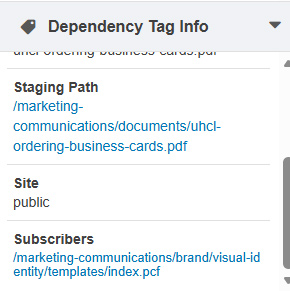
Step 4: Locate "Subscribers" under "Dependency Tag Info"
Under "Dependency Tag Info" you will now see additional information about this page/file, including the actual "Subscribers" - or other pages linking to this page/file. Clicking the "Subscriber" links will take you directly to that web page in staging. If you are not able to click a link, it is because it is in another department's web section that you do not have access to edit.